
Build a Perplexity AI Clone: Next.js, React, Tailwind, Clerk & Supabase (Video Course)
Build a real-time, AI-powered search and summarization app from scratch using Next.js, React, Tailwind CSS, and Inngest. Learn to combine modern tools, orchestrate workflows, and deliver polished, scalable features,perfect for hands-on builders.
Related Certification: Certification in Building Full-Stack AI Chat Apps with Next.js, React, and Supabase
Also includes Access to All:
What You Will Learn
- Set up a Next.js app with the App Router
- Build a responsive UI using Tailwind CSS and shadcn/ui
- Implement authentication and route protection with Clerk
- Persist searches and history using Supabase
- Fetch live web results via the Brave Search API
- Orchestrate LLM summarization with Inngest and Gemini, then deploy on Vercel
Study Guide
Introduction
Welcome to “🚀 Build a Perplexity AI Clone with Next.js, React, Tailwind CSS, Inngest | Full Stack AI App.”
This course is your step-by-step guide to building a modern, real-time, AI-powered search and summarization engine that replicates the core functionality of Perplexity AI. If you want to deeply understand how to combine the best of modern web technologies, cloud services, and AI models to create an end-to-end product, you’re in the right place.
We won’t just assemble pieces; we’ll dissect and rebuild every layer: from setting up a Next.js project and crafting a beautiful, responsive UI with Tailwind and shadcn/ui, to integrating authentication with Clerk, persisting data in Superbase, fetching live search results with the Brave Search API, orchestrating AI summarization using Inngest and Gemini, and deploying everything seamlessly on Vercel.
By the end, you’ll not only have a robust Perplexity AI clone,you’ll have mastery over the modern full stack landscape, a toolbox of best practices, and the mindset to build complex, scalable AI products from scratch.
Getting Started: The Vision and Stack
Before we write a line of code, clarity is power. Let’s break down what we’re building, why, and with what tools.
Main Goal: Recreate the Perplexity AI experience: a user-friendly web app where users can ask anything, get real-time search results, and receive smart, AI-generated summaries. The solution combines live search APIs (Brave), AI large language models (Gemini), robust authentication (Clerk), persistent storage (Superbase), and seamless serverless orchestration (Inngest).
Core Technologies:
- Next.js: Modern React-based framework for SSR, client & server components, and folder-based routing.
- Tailwind CSS & shadcn/ui: Rapid, utility-first styling and a library of customizable components.
- Clerk: Plug-and-play authentication: sign-in, sign-up, and user management.
- Superbase: Easy-to-use, scalable cloud database and API.
- Brave Search API: Real-time search results from the web.
- Inngest: Serverless task orchestration, especially for long-running AI calls.
- Gemini (LLM): Google’s powerful large language model for summarization and Q&A.
- Vercel: Effortless deployment and hosting for Next.js apps.
Mindset: This isn’t just about stringing together APIs. It’s about understanding how modern products work under the hood, architecting for scale, and building for real users.
Project Setup: Laying the Foundation
Every strong product stands on a well-structured foundation. Let’s scaffold our app with Next.js and configure our environment for seamless development.
Step 1: Create the Next.js Application
Open your terminal, navigate to your desired directory, and run:
npx create-next-app@latest
When prompted, use the following configuration:
- TypeScript: No (for simplicity, but you can use it if you’re comfortable)
- ESLint: No
- Tailwind CSS: Yes
- Source directory: No
- App Router: Yes
- Turbopack: No
This creates a project with the app directory as the root of routing and component organization. All of your pages, layouts, and global styles will live here. The App Router enables advanced routing and server/client component support.
Step 2: Understanding Folder-Based RoutingNext.js’s App Router treats every folder inside the app directory as a route. Folders named with an underscore (e.g., _components) or wrapped in parentheses (e.g., (auth)) are ignored as routes,useful for organizing components, providers, or shared utilities.
Examples:
- app/page.js → renders at
/ - app/search/[libId]/page.js → renders at
/search/1234(dynamic route) - app/_components/Sidebar.jsx → not a route, just a reusable component
- app/(auth)/sign-in/page.jsx → custom auth page, not exposed as a direct URL
Best Practice: Organize shared components, utilities, and providers inside folders that don’t generate routes. It keeps your structure clean and your routing logic clear.
Styling: Tailwind CSS and shadcn/ui
Modern users expect fast, beautiful, and responsive interfaces. Tailwind CSS and shadcn/ui make this possible without reinventing the wheel.
Tailwind CSS: Utility-First StylingTailwind is pre-installed. You’ll find globals.css in app/globals.css. This is where you apply global styles, import fonts, and define theme variables (like colors in OKLCH format for perceptual uniformity).
Example:
/* app/globals.css */
:root {
  --primary: oklch(62.234% 0.121 264.5);
  --secondary: oklch(82.9% 0.1147 226.6);
}
shadcn/ui: Component Library
shadcn/ui is a collection of headless, accessible UI components built on Tailwind. Initialize it with:
npx shadcn-ui@latest init
Add components as needed (e.g., for a Button):
npx shadcn-ui@latest add button
Examples:
- Use the Tabs component for toggling between “Search” and “Research” modes.
- DropdownMenu for selecting AI models.
Best Practice: Only add the components you need. This keeps your bundle size small and your project maintainable.
The Sidebar: Navigation and State
Every app needs a backbone for navigation and context. Our sidebar anchors the experience, offering quick access to Home, Library, Discover, and authentication actions.
Sidebar Component OrganizationCreate your Sidebar in app/_components/Sidebar.jsx. By prefixing the folder with an underscore, you prevent it from becoming a route.
Wrap your app in a SidebarProvider to manage sidebar state (open/close, active item). This provider can be placed in your app/layout.js to ensure global access.
Navigation Items and Active StylingDefine your navigation items as an array of objects, each with an icon (from lucide-react), title, and path.
Use the usePathname hook from next/navigation to determine the current route and conditionally style the active item.
Example:
const navItems = [
{ icon:
Highlight the active item with a different background or border if pathname matches the item’s path.
Authentication Actions
Display a “Sign Up” button when the user is not signed in, and switch to “Log Out” when authenticated. Use Clerk’s useUser hook to check authentication state.
Include a sidebar footer with “Try Pro” and “Learn More” sections for additional user engagement.
Tips:
- Keep navigation logic in a single place for easy updates.
- Icons add clarity,use lucide-react for a consistent set.
- Sidebar state (open/collapse) can be managed via context for mobile responsiveness.
Building the Chat Input Area
At the heart of any AI search experience is a simple, intuitive input box. Ours will support multiple modes, AI model selection, and contextual icons.
ChartInputBox ComponentCreate ChartInputBox.jsx in _components. This component will be used both on the home page and at the bottom of the search results page.
Features:
- Logo image (preferably SVG for scalability and clarity)
- HTML input field with placeholder (e.g., “Ask anything”)
- Styling for centering, padding, border, and rounded corners via Tailwind
- Tab functionality (Search / Research) using shadcn/ui Tabs
- Icons (CPU, Globe, Paperclip, Mic, AudioLines) next to the input (lucide-react)
- Dropdown menu for selecting AI models (DropdownMenu from shadcn/ui). Model options are stored centrally (e.g., services/AIModelsOption.js), possibly fetched from openrouter.ai or similar.
- Keep the input focused and accessible,use
autoFocusif appropriate. - Conditionally change the input’s placeholder based on the active tab.
- Debounce input events for better performance if adding live suggestions.
- Store selected AI model in a global context or local state for easy access.
Authentication with Clerk: Secure User Management
Authentication shouldn’t be complicated. Clerk’s plug-and-play solution gives us a seamless sign-in/sign-up flow, user management, and route protection with minimal effort.
Setting Up Clerk
Install Clerk’s Next.js SDK:
npm install @clerk/nextjs
Add your Clerk environment keys to .env.local:
- NEXT_PUBLIC_CLERK_PUBLISHABLE_KEY
- CLERK_SECRET_KEY
Wrap your app in ClerkProvider in app/layout.js:
import { ClerkProvider } from "@clerk/nextjs";
...
return (

    {children}

);
Custom Sign-In/Sign-Up Pages
Override Clerk’s default UI by creating custom pages in an (auth) folder inside app:
- app/(auth)/sign-in/page.jsx
- app/(auth)/sign-up/page.jsx
These pages can use Clerk’s React components to render custom forms or modals.
Route Protection with MiddlewareAdd middleware.js at the project root to protect private routes:
// middleware.js
import { withClerkMiddleware } from "@clerk/nextjs/server";
export default withClerkMiddleware((req) => {
  // Custom logic here
});
export const config = {
  matcher: ["/((?!_next|api|static|public|favicon.ico).*)"],
};
This ensures only authenticated users can access private pages. Public routes (like home or Clerk’s API endpoints) can be whitelisted.
Best Practices:- Use Clerk’s SignUpButton and SignInButton for modal flows.
- Always check user state before performing actions that require authentication.
- Use useUser for access to profile info, for things like displaying profile images in the UI.
Example:
import { useUser } from "@clerk/nextjs";
const { user, isSignedIn } = useUser();
Database Integration: Superbase as the Source of Truth
Persisting user data and search history is critical. Superbase offers a PostgreSQL-powered, scalable, real-time backend that integrates beautifully with modern React apps.
Superbase Setup
Install the Superbase JavaScript client:
npm install @supabase/supabase-js
Add your Superbase environment keys to .env.local:
- NEXT_PUBLIC_SUPABASE_URL
- SUPABASE_SERVICE_ROLE_KEY
Create a Superbase client in services/superbase.js:
import { createClient } from "@supabase/supabase-js";
const supabase = createClient(process.env.NEXT_PUBLIC_SUPABASE_URL, process.env.SUPABASE_SERVICE_ROLE_KEY);
export default supabase;
Database Schema
Create these tables in the Superbase dashboard:
- users:
- name (text)
- email (text)
- credits (integer, default value)
- subscription_id (text)
- library:
- lib_id (UUID, primary key)
- user_id (foreign key to users)
- search_query (text)
- created_at (timestamp)
- charts:
- lib_id (foreign key to library)
- search_result (JSON data: title, description, URL, thumbnail, etc.)
- ai_response (text)
Note: Row Level Security (RLS) is disabled for simplicity in this tutorial. In production, always enable and configure RLS for security.
User Onboarding Logic
On login/sign-up, use Clerk’s user info to check if the user exists in the users table. If not, insert a new record using Superbase’s .select() and .insert() methods.
Implement this logic in a provider.jsx file wrapped around your application. Mark it as a client component so it can access hooks and context.
Use a UserDetailContext to make user details globally accessible throughout the app.
Best Practices:- Never expose service role keys in client-side code. Use environment variables and server-side logic where possible.
- Normalize user data,store only what you need and keep it consistent.
- Ensure all database writes are atomic to prevent data inconsistencies.
Implementing Search and Summarization: Brave Search API & Inngest-Gemini Workflow
This is the core of our Perplexity AI clone: real-time, multi-source search with LLM-generated responses. The workflow is a dance between frontend, backend, and external APIs.
1. Handling User Search QueriesWhen a user submits a query:
- Generate a unique lib_id with uuid/v4 for each query.
- Insert the query into the library table along with the user_id.
- Programmatically navigate to /search/[libId] using useRouter.
Example:
import { v4 as uuidv4 } from "uuid";
const lib_id = uuidv4();
await supabase.from("library").insert([{ lib_id, user_id, search_query }]);
router.push(`/search/${lib_id}`);
2. Dynamic Search Result Page
The /search/[libId] route is a dynamic page that loads the search query using useParams to extract the libId from the URL.
Best Practice: Mark this page as a client component if you need to use hooks for fetching, polling, or context.
3. Brave Search API IntegrationCreate a Next.js API route at /api/brave-search-api to fetch real-time search results:
- Use axios or fetch to make a
GETrequest to the Brave Search API endpoint. - Pass the user’s query as a parameter.
- Include the Brave API key in the BRAVE_API_KEY header (stored in .env.local).
- Return the response data to the client.
Example:
const res = await fetch(`${process.env.BRAVE_SEARCH_API_URL}?q=${query}`, {
  headers: { "Authorization": `Bearer ${process.env.BRAVE_API_KEY}` }
});
4. Saving and Displaying Results
Store the formatted search results (title, description, URL, thumbnail, etc.) in the charts table, linked by lib_id.
Display the results on the client, mapping over the returned data to generate source cards or list items. Clicking a source should open its URL in a new browser tab.
Example:
- Display search results in the “Sources” tab.
- Show image thumbnails in the “Images” tab.
Long-running AI model calls can block UI responsiveness. Inngest orchestrates these as serverless background functions.
- Install Inngest and run the local dev server:
npx inngest dev - Create an Inngest client in inngest/client.js.
- Create a Next.js API route at /api/inngest for Inngest to communicate with your app.
- Define an Inngest function called llmModel in inngest/functions.js using
inngest.createFunction. - Within the function, use
step.ai.inferto call the Gemini model (e.g., Gemini 1.5 Flash) with a prompt including the user query and search results. - The Gemini API key is stored as GOOGLE_AI_API_KEY in .env.local.
- Trigger the Inngest function after saving search results; save the returned run ID.
Example:
const runId = await inngestClient.runFunction("llmModel", { prompt, searchResults });
6. Polling for AI Response
Create a Next.js API route at /api/get-ingest-status to check the Inngest function status:
- Call the Inngest API with the run ID and an authorization header (using INGEST_SIGNING_KEY).
- On the client, set up an interval to poll this endpoint every few seconds.
- When status is “completed,” stop polling and fetch the updated AI response from the database.
- Use skeleton loaders (animate-pulse from Tailwind) to signal loading states.
- Always store the AI response persistently for history and retrievability.
- Keep polling intervals reasonable (e.g., every 2-3 seconds) to balance responsiveness and API usage.
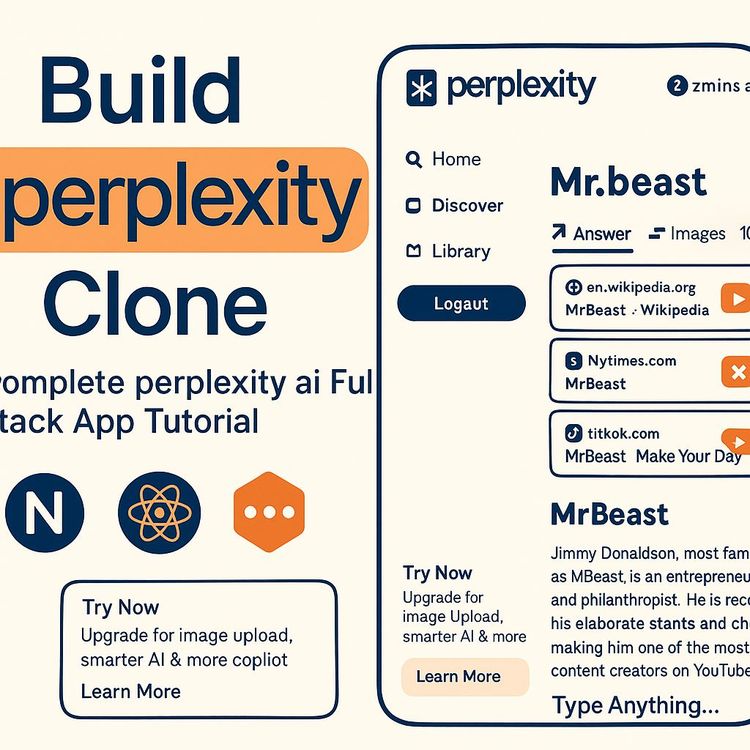
User Interface: Search Results, Tabs, and Content Display
A great product is defined by clarity and speed in the user interface. Let’s break down the experience and the logic behind each section.
1. Header Section
- Display the user’s profile image (via Clerk’s UserButton).
- Show the timestamp of the search (format with moment.js).
- Include share/link buttons for virality and citation.
2. Tabs for Content Segmentation
- Use shadcn/ui Tabs to switch between “Answer,” “Images,” “Video,” and “Sources.”
- State is managed locally or via context depending on app complexity.
3. Displaying Different Content Types
- “Answer” tab: Show the AI-generated summary or answer (from charts.ai_response).
- “Images” tab: Map over search results to display image thumbnails.
- “Video” tab: Integrate video results (if Brave Search API supports it).
- “Sources” tab: List all sources with titles, descriptions, and clickable URLs.
4. Input for New Search
Add the ChartInputBox at the bottom of the result page for quick, continuous exploration.
5. Skeleton Loaders
While waiting for API data or AI responses, display skeleton elements using Tailwind’s animate-pulse for a smooth, professional feel.
Examples:
- Use
<div className="h-6 bg-gray-200 animate-pulse"></div>as a placeholder for summaries. - Show an array of placeholder cards while images or sources load.
Search History: The Library Page
Empower users to revisit their research. The library page is a timeline of past searches, each linked to its results and AI summaries.
1. Route and ComponentCreate app/library/page.jsx. On load, fetch all library records for the logged-in user, ordered by created_at.
Display each history item with:
- Search input (as a clickable title or preview)
- Creation time (formatted with moment.js)
Clicking a history item navigates the user to /search/[libId] for full details.
Best Practices:- Fetch history only after ensuring user info is loaded (wait for Clerk’s user state).
- Paginate or lazy-load history for users with many records.
- Allow search/filtering within the library for power users.
Discover Page: Trending Topics and Exploration
Go beyond direct search. The discover page offers curated topics and news, driving engagement and serendipitous discovery.
1. Route and TopicsCreate app/discover/page.jsx. Define a list of topics (e.g., Top, For You, Tech, Science, Finance), each with an associated icon (from lucide-react).
Render these as clickable tabs or buttons.
2. Fetching and Displaying NewsWhen a topic is clicked:
- Trigger a Brave Search API call for that topic’s latest news.
- Format the results to remove HTML tags as needed (e.g., stripping <strong> tags from descriptions).
- Display results as news cards: title, description, and thumbnail image.
- Clicking a news card opens the source URL in a new tab.
Example:
const cleanDescription = description.replace(/<.*?>/g, "");Tips:
- Optimize for mobile by making cards responsive and touch-friendly.
- Consider caching topic results to reduce redundant API calls.
Deploying on Vercel: Going Live
Shipping is a feature. Vercel makes deployment seamless for Next.js apps, with best-in-class build pipelines, environment management, and integrations.
1. Connect to GitHubPush your code to a GitHub repository. In Vercel, import your repo and select the appropriate project settings.
2. Environment VariablesAdd all environment variables from .env.local to Vercel’s project settings:
- NEXT_PUBLIC_CLERK_PUBLISHABLE_KEY
- CLERK_SECRET_KEY
- NEXT_PUBLIC_SUPABASE_URL
- SUPABASE_SERVICE_ROLE_KEY
- BRAVE_API_KEY
- GOOGLE_AI_API_KEY
- INGEST_SIGNING_KEY
- INGEST_EVENT_KEY
Tip: Never hardcode secrets. Always use environment variables and restrict their scope.
3. Inngest Deployment IntegrationConnect Inngest to your Vercel project via the Inngest dashboard. Add your application’s domain to Inngest for API communication.
Inngest will automatically add necessary environment variables (INGEST_SIGNING_KEY, INGEST_EVENT_KEY) to your Vercel settings.
4. TroubleshootingIf you experience issues with Inngest or deployment, verify:
- All environment variables are set and match your local development setup.
- Deployment protection settings allow Inngest to sync with your app.
- Your API routes are correctly configured and exposed.
Best Practice: Monitor deployments and errors via Vercel’s dashboard for real-time feedback.
Best Practices and Tips for a Production-Ready App
Mastery means going beyond “it works.” Here are key principles to make your Perplexity AI clone robust, maintainable, and delightful.
- Security: Never expose sensitive keys in client code. Lock down Superbase RLS in production.
- Performance: Use server components for heavy data fetching. Debounce user input. Optimize image loading and use skeleton loaders.
- Code Organization: Keep components small and focused. Use providers and context for global state (e.g., user, sidebar, selected AI model).
- Scalability: Modularize logic for authentication, database, and API integrations. This allows easy swapping of services.
- Testing: Write integration and end-to-end tests for core workflows: search, authentication, data persistence.
- UX/UI: Use consistent spacing, colors, and typography. Always provide feedback for loading, error, and success states.
- Accessibility: Ensure all interactive elements are keyboard-navigable and screen-reader friendly.
Conclusion: Your Roadmap to Full Stack AI Product Mastery
You’ve just journeyed through every layer of building a modern, AI-powered search and summarization platform. You’ve learned to structure a Next.js project for clarity and scalability, design beautiful interfaces with Tailwind and shadcn/ui, authenticate users seamlessly with Clerk, persist and retrieve data using Superbase, harness real-time search with the Brave API, orchestrate complex AI workflows with Inngest and Gemini, and deploy reliably with Vercel.
The magic isn’t just in the code,it’s in how these technologies weave together to create an experience that feels effortless for the user and maintainable for the developer. By mastering these systems, you’ve built not just a Perplexity AI clone, but a launchpad for any future full stack AI app you dream up.
Remember: Creation is iteration. The best way to truly learn is to apply these principles, experiment, and push the boundaries of what’s possible. Your next product could be the one that changes how people discover and understand information. So take these skills, build boldly, and let your curiosity lead the way.
You now hold the keys to building world-class, AI-driven products,one well-architected component at a time.
Frequently Asked Questions
This FAQ is designed to answer key questions about building a Perplexity AI clone using Next.js, React, Tailwind CSS, Inngest, and related tools. It covers everything from foundational concepts and setup to advanced implementation details, practical tips, and troubleshooting common issues. You'll find information relevant for both newcomers and experienced professionals, as well as insights into how these technologies come together for full-stack AI app development.
What are the key features of Next.js used in this project?
Next.js offers React Server Components, folder-based routing, and both client-side and server-side rendering.
These features make it faster and easier to build web applications that scale. Folder-based routing allows you to organize pages and API endpoints simply by creating files and folders, while React Server Components and rendering flexibility boost performance and efficiency.
How is Tailwind CSS and Shadcn UI integrated into the project?
Tailwind CSS is added during project creation, and Shadcn UI is initialized post-setup.
Tailwind enables rapid styling with utility classes, and Shadcn UI provides ready-made components built on Tailwind. You install Shadcn UI with a command, and then fetch components like buttons or tabs as needed,these go into the components/ui folder for easy reuse and customization.
How is user authentication handled in the application?
Clerk manages user authentication, offering secure sign-in and sign-up flows.
The app uses Clerk's SDK and environment keys, protecting routes via middleware and wrapping the main app in ClerkProvider. Custom sign-in and sign-up pages leverage Clerk components, and the sidebar adjusts based on user status using the useUser hook.
What database is used and how is it set up and connected?
Superbase serves as the database, with setup completed via its dashboard and JavaScript client.
You create tables like users, library, and charts, then install supabase-js and configure a client using environment variables. RLS (Row Level Security) is typically disabled during development since Clerk handles authentication.
How is user search input saved and managed?
User queries are saved to the Superbase library table, each tagged with a unique lib_id.
The system uses uuidv4 to generate unique IDs for searches. After saving the input, the app navigates to a dynamic route representing that search, allowing users to revisit or share individual search sessions.
How does the application fetch external search results?
The app uses a custom API endpoint to relay user queries to the Brave Search API.
This endpoint, implemented as a serverless function, accepts search parameters, uses Axios to contact Brave's API, and passes authentication headers securely from environment variables. The response is then formatted and returned as JSON.
How are LLM models integrated for generating answers?
LLM integration is handled through Inngest, which triggers inference functions using Step.AI.
A dedicated Inngest function takes search queries and results, then uses step.ai.infer to generate summaries or answers. This workflow is managed via API endpoints and Inngest's task orchestration features.
How are search results and LLM responses displayed to the user?
Results are shown on a dynamic route, with tabs for answers, images, and sources.
The UI fetches search data using the lib_id, displays sources from Brave, and the LLM's summary. Polling checks for LLM completion, updating the display once the response is ready. Tabs let users switch between views for a rich, interactive experience.
What is the primary benefit of using Next.js for this project?
Next.js streamlines development by combining routing, server components, and flexible rendering in one framework.
This means faster prototyping, easier scaling, and better performance out of the box, making it a strong choice for full-stack AI applications.
How do you create a new Next.js application using the command line?
Use npx create-next-app@latest and follow the interactive prompts.
You'll specify the project name, choose settings (like using TypeScript or Tailwind), and the CLI scaffolds the project structure for you. This method ensures you're always starting with the latest Next.js setup.
What is the purpose of the app folder in a Next.js project?
The app folder organizes routes, layouts, and global resources for the App Router system.
It centralizes your pages, shared layouts, and often global styles, making the codebase easier to maintain and extend as your app grows.
What is Shadcn UI and why is it used in this project?
Shadcn UI is a collection of prebuilt, customizable UI components based on Tailwind CSS.
It lets you quickly assemble user interfaces with consistent design and minimal styling effort, so you can focus more on business logic and less on UI boilerplate.
How is a Shadcn UI component, like a button, added to the project after initializing Shadcn UI?
Install new components using the Shadcn CLI, which generates files in components/ui.
For example, running a command like npx shadcn-ui@latest add button creates a Button component you can import and use throughout your app, keeping your UI modular and reusable.
What is the naming convention for folders in Next.js that should not be treated as routes, and why is it used for the _component folder?
Folders starting with an underscore (e.g., _component) or enclosed in circular braces are ignored by Next.js routing.
This keeps reusable code separate from page routes, preventing accidental URL creation and keeping routing clean.
How does the usePathname hook from next/navigation help in styling sidebar menu items?
usePathname returns the current path, enabling conditional UI logic.
You can compare it to sidebar item paths, highlighting the active item for a better user experience,think of how navigation bars show which page you're on.
What authentication service is used in the project, and what is a key benefit?
Clerk is the authentication service, offering ready-to-use sign-in and sign-up interfaces.
This minimizes the need for custom authentication UI or logic, saving significant development time while maintaining security and flexibility.
How is Superbase integrated into the Next.js application, and what information is needed?
Install supabase-js and create a client using the Superbase URL and public key from the dashboard.
These credentials are stored as environment variables, allowing secure and flexible database connections from your app code.
What is the purpose of creating a dynamic route like [lib_id] for the search results page?
Dynamic routes let you display data for unique search sessions, keyed by lib_id.
This means each search has its own page and URL, making it easy to share, bookmark, or revisit previous searches,much like how email threads or chat conversations get unique URLs.
How is the application structured using Next.js, the App Router, and components?
The project uses Next.js's App Router for organizing routes and layouts, with reusable components for UI and logic.
The app directory holds the main pages and layouts, while components are split into folders for UI, authentication, and business logic. This modular approach keeps the codebase clean and easy to scale.
How does the Clerk authentication flow protect routes and manage sign-in/sign-up?
Routes are guarded with middleware, and custom pages use Clerk components for sign-in and sign-up.
When a user tries to access protected content, middleware checks their authentication status, redirecting as needed. Clerk's components handle the UI, and the app adapts (e.g., sidebar button changes) based on whether a user is logged in.
How does the application save user search queries and results to Superbase?
Each search is stored in the library table with a unique ID, along with user info and the query.
Search results (from Brave) and LLM responses are saved in the charts table, linked by the same lib_id. This structure makes it easy to retrieve and display all data related to a specific search.
How are the Brave Search API and Inngest.ai used for search results and AI responses?
The Brave API provides real-time search results, which are processed through Inngest.ai for LLM summaries.
A serverless function fetches external results, then triggers an Inngest function that calls Step.AI. The resulting AI-generated answer is stored and later displayed to the user, closing the loop.
How does the user interface display search results, including tabs for different content types?
The search results page uses header, tabs (Answer, Images, Sources), and conditional rendering.
When the user switches tabs, only relevant content is shown,for example, the AI-generated answer under "Answer," images from sources under "Images," and a list of result links under "Sources." This keeps the experience organized and intuitive.
What are the differences between server-side and client-side rendering in Next.js?
Server-side rendering generates HTML on the server before sending it to the client, while client-side rendering builds content in the browser after loading JavaScript.
Server-side rendering is better for SEO and initial load performance; client-side rendering offers dynamic interactivity but may delay content display. Next.js lets you choose the best approach for each page.
Why choose Tailwind CSS over traditional CSS or other frameworks?
Tailwind CSS uses utility classes for rapid, consistent styling directly in your markup.
This eliminates the need for custom CSS files for many styles, reduces naming conflicts, and speeds up design changes,helpful when iterating quickly or working in teams.
Can Shadcn UI components be customized to match brand guidelines?
Yes,Shadcn UI components are built on Tailwind, so you can override styles, classes, or even component structure.
For example, you can adjust button colors, spacing, or add custom icons to fit your brand, all while using familiar utility classes.
How should environment variables (like API keys) be managed securely?
Store sensitive values in .env.local or similar environment files, never directly in code.
Make sure your .gitignore includes these files to prevent accidental sharing. Use environment variables in both local and production deployments to keep secrets safe.
What are common issues when integrating Clerk authentication, and how can they be resolved?
Misconfigured environment variables and incorrect middleware setup can block authentication flows.
Double-check keys in .env.local, confirm the ClerkProvider wraps your app, and ensure middleware is set up to protect only the routes you intend. Clerk’s documentation provides troubleshooting tips for common problems.
What is Row Level Security (RLS) in Superbase, and why might you disable it during development?
RLS restricts table rows by user roles or conditions, improving security in production.
During development, it's often disabled to avoid accidental access issues,especially when using external authentication like Clerk. Just remember to revisit RLS settings before launch for proper data protection.
Why use UUIDs (like uuidv4) instead of auto-incrementing IDs for searches?
UUIDs are globally unique, reducing conflicts and making URLs harder to guess.
They’re ideal for distributed systems or public URLs, where predictability could be a security risk or where multiple clients might generate entries simultaneously.
What are best practices for working with dynamic routes in Next.js?
Use descriptive parameter names and validate data loaded via dynamic routes.
For example, /search/[lib_id] should fetch and check that the lib_id exists and belongs to the user (if required). Handle errors gracefully, such as showing a 404 page or custom error message.
What advantages does Inngest offer for integrating LLM and background workflows?
Inngest simplifies running and monitoring background jobs, like AI model inference or data processing.
It allows you to build reliable, event-driven workflows that can be retried, tracked, or chained together,ideal for handling LLM tasks that might take time or occasionally fail.
Is polling the only way to check for LLM results, or are there alternatives?
Polling is simple, but for a more efficient user experience consider using webhooks or real-time subscriptions.
While polling checks for updates at intervals, webhooks or sockets can push results to the client instantly when ready, reducing wait times and server load.
What are common challenges when deploying this stack (Next.js, Superbase, Clerk, Inngest) to production?
Misaligned environment variables, database permissions, and API rate limits are frequent deployment hurdles.
Before going live, confirm all environment variables are set, database RLS is configured for production, and any third-party API quotas are sufficient for your expected traffic. Test sign-in/sign-up flows end-to-end to catch integration issues.
How scalable is this architecture for larger user bases?
The stack is designed to scale horizontally, with managed services like Superbase and Clerk reducing backend overhead.
For higher loads, monitor usage, adjust database indices, and consider caching popular queries. Using serverless functions for APIs makes it easier to scale without managing servers directly.
What are practical business use cases for building a Perplexity AI clone?
This architecture suits knowledge bases, enterprise search, internal Q&A bots, customer support, and research tools.
You can adapt it for company wikis, product documentation search, or even legal/medical knowledge assistants,any context where users need curated, AI-powered answers from both web and internal data.
How can you monitor and secure usage of external APIs (like Brave or Step.AI) to prevent abuse?
Track API usage metrics, enforce rate limits, and restrict API keys to your production domains.
If needed, add authentication or user quotas in your backend endpoints to ensure fair use and prevent costly overages.
How do you test the application locally before deploying?
Use mock environment variables, run Superbase locally or connect to a non-production instance, and test all flows thoroughly.
Check sign-in, search, and data saving. Use browser dev tools and logging to catch errors early, and test edge cases like invalid search queries or expired sessions.
How do you ensure the UI is accessible when using Tailwind CSS and Shadcn UI?
Follow accessibility guidelines (WCAG), use semantic HTML, and leverage built-in ARIA attributes in Shadcn UI components.
Test with screen readers and keyboard navigation. Tailwind’s utility classes can help with focus states and color contrast, boosting usability for all users.
Can you provide a real-world example of how dynamic routing improves user experience in this app?
Dynamic routing lets each search query have its own shareable URL, like /search/abc123.
This means a user can save, bookmark, or send a link to a colleague, who then sees the exact same results,similar to how sharing a Google Doc or a chat thread works.
Where can I learn more about the tools used in this project?
Visit the official documentation for Next.js, Tailwind CSS, Shadcn UI, Clerk, Superbase, Inngest, and Brave Search API.
Most of these resources have tutorials, examples, and active communities. Exploring the docs alongside your own experiments leads to deeper understanding and confidence.
Certification
About the Certification
Get certified in building real-time AI-powered applications with Next.js, React, Tailwind, and Supabase. Demonstrate the ability to create scalable search and summarization tools, orchestrate workflows, and deliver polished user experiences.
Official Certification
Upon successful completion of the "Certification in Building Full-Stack AI Chat Apps with Next.js, React, and Supabase", you will receive a verifiable digital certificate. This certificate demonstrates your expertise in the subject matter covered in this course.
Benefits of Certification
- Enhance your professional credibility and stand out in the job market.
- Validate your skills and knowledge in cutting-edge AI technologies.
- Unlock new career opportunities in the rapidly growing AI field.
- Share your achievement on your resume, LinkedIn, and other professional platforms.
How to complete your certification successfully?
To earn your certification, you’ll need to complete all video lessons, study the guide carefully, and review the FAQ. After that, you’ll be prepared to pass the certification requirements.
Other AI Video Courses

Video Course: What is Generative AI and how does it work?

Video Course: How to Use ChatGPT from Beginner to Professional

Video Course: How to Use Google Gemini for Google Workspace to Boost Productivity

Video Course: How to Use Claude 3.7 AI - Tips for Beginners!

Video Course: ChatGPT for Data Analytics: Full Course - from Beginners to Professional

Video Course: Generating Images and photos With ChatGPT?

Video Course: Generating Images & Photo's with MidJourney

Video Course: Generating Design's with Microsoft Designer and AI

Video Course: Generating Design's with Canva.com and AI
Join 20,000+ Professionals, Using AI to transform their Careers
Join professionals who didn’t just adapt, they thrived. You can too, with AI training designed for your job.


