
Excel Formatting and AI Automation: Boost Productivity with Advanced Techniques (Video Course)
Transform your Excel skills with practical techniques in formatting, reporting, and automation,plus real integration of AI tools. Build confidence for smarter analysis and stand out with polished, efficient work that drives your career forward.
Related Certification: Certification in Applying Advanced Excel Formatting and AI Automation for Productivity
Also includes Access to All:
What You Will Learn
- Format cells professionally (fonts, alignment, borders, fill, number formats)
- Use the Format Cells dialog and essential keyboard shortcuts for speed
- Build clean, consistent reports and dashboards for business use
- Prepare data for AI and automate workflows with macros and AI add-ins
- Apply reporting standards and create a portfolio-ready workbook
Study Guide
Introduction: Why “Advanced Excel with AI” Matters
Excel isn’t just a grid of numbers and text. It’s the backbone of decision-making for businesses, the silent partner in every analyst’s workflow, and now, with the surge of AI-driven tools and automation, it’s evolving into something even more powerful.
“Advanced Excel with AI” is your complete learning guide to mastering not only the essentials of formatting and navigation, but also embedding a mindset of clarity, efficiency, and future-focused skills. Whether you’re a beginner aiming to build a rock-solid foundation or an experienced user seeking to refine your craft and leverage AI for smarter, faster work, this course covers every detail you need.
You’ll move step-by-step from the basics,like formatting cells and using keyboard shortcuts,to the advanced edges of reporting, automation, and career strategy. Along the way, you’ll learn not just how to make your spreadsheets look good, but how to make them work for you, your team, and your career.
Getting Started: Excel’s Building Blocks
Before you can automate, analyze, or impress a manager, you need to know the terrain. Let’s break down the essentials,the “anatomy” of Excel.
Cell Identification
Every cell in Excel has a unique address, like D5 or F5. The column letter comes first, then the row number. This system allows for precise navigation, referencing, and formula-building.
Examples:
1. If you type in D5, you’re pointing to the cell in column D, row 5.
2. F5 refers to column F, row 5.
Ribbon Navigation
The Ribbon is the strip of tabs at the top,Home, Insert, Page Layout, Formulas, and more. Each tab holds groups of related commands. The Ribbon is your control panel for everything from formatting to formulas to AI-driven tools.
Tips:
- Start with the Home tab. Nearly every basic formatting command lives here.
- Explore other tabs as you become comfortable,Formulas for calculations, Data for sorting/filtering, Review for comments and tracking changes.
Mastering Basic Formatting: Make Your Data Speak
Formatting is the difference between raw data and a report that speaks for itself. Clean, consistent formatting isn’t just aesthetics,it’s clarity, professionalism, and often, the key to a promotion.
Changing Font Style, Size, and Colour
- Font Face: This determines the “personality” of your text, such as Calibri, Arial, or Times New Roman.
- Font Size: Controls how big or small your text appears. Standard sizes for data are 10-12pt, but headers may use 14-18pt for emphasis.
- Font Colour: Adds meaning and distinction. Use it to highlight, categorize, or alert.
Examples:
1. Use Calibri, size 12, black for general data. Change to Arial, size 16, blue for headers.
2. Highlight negative numbers in red to instantly show financial losses.
Applying Bold, Italic, and Underline
- Bold (Ctrl+B): Emphasize totals or important labels.
- Italic (Ctrl+I): Denote notes or assumptions.
- Underline (Ctrl+U): Draw attention to key headers or subtotals.
Examples:
1. Bold the grand total row in a financial sheet.
2. Italicize explanatory notes under a table.
Best Practice: Don’t overdo formatting. Use bold, italics, and colour sparingly,too much, and you lose the signal in the noise.
Cell Alignment and Text Orientation: Structure Creates Clarity
How your data is aligned and oriented communicates structure and intent. Don’t let your numbers and text sprawl across the page.
Aligning Cell Content
- Left, Centre, Right: Numbers are usually right-aligned, text is left-aligned, and headers are often centered.
- Vertical Alignment: Top, middle, or bottom,especially relevant for larger cells.
Examples:
1. Center-align column headers for a professional look.
2. Right-align financial figures for easy comparison.
Changing Text Orientation
- Rotate text vertically or diagonally to fit more headers into a narrow column.
Examples:
1. Use vertical text for column headers in a dashboard.
2. Angle text for months in a compact summary table.
Wrap Text and Merge Cells: Managing Long Strings
Long descriptions and tight spaces? Don’t let your text spill over or disappear.
Wrap Text
- Wrap Text breaks long strings into multiple lines within a single cell, fitting content neatly without overflow.
Examples:
1. Product descriptions in inventory lists,wrap text so all information stays visible.
2. Multi-line addresses,use wrap text to display each part on a new line.
Merge Cells (Use Sparingly!)
- Combines two or more cells into one. Useful for big headers, but can disrupt sorting/filtering.
Examples:
1. Merge cells A1:C1 to create a single centered report title.
2. Merge header cells across a table to label grouped columns.
Tip: Prefer “Center Across Selection” as an alternative to merging, especially in complex tables.
Cell Styles and Themes: Consistency at Scale
Manual formatting is tedious. Cell styles and themes deliver instant, standardized looks that match company branding and reporting standards.
Applying Predefined Cell Styles
- Cell Styles instantly apply a bundle of formatting,font, colour, borders, fill,to selected cells.
Examples:
1. Apply the “Good” style for positive results, “Bad” for negative, and “Neutral” for summaries.
2. Use the “Heading 1” style for all table titles in your report.
Inserting Background Images and Changing Themes
- Insert a subtle background image for branding or visual separation.
- Themes update fonts, colours, and effects across the workbook.
Examples:
1. Add your company logo as a watermark in the background of summary sheets.
2. Change the entire report’s colour palette to match your organization’s brand colours.
Best Practice: Keep backgrounds subtle and themes simple,avoid anything that distracts from the data.
Number Formatting: Speak the Language of Business
Numbers are only useful if they’re clear and relevant. Number formatting turns raw data into insight.
Formatting Numbers
- Control decimal places, separators, and the type of number format,General, Number, Currency, Percentage, etc.
Examples:
1. Format sales volumes to two decimal places for precision.
2. Display percentages in summary tables for growth rates.
Currency Symbols
- Add currency symbols, including Rupees, Dollars, Euros, etc.
Examples:
1. Show Indian Rupee (₹) for local budgets.
2. Use USD ($) for international financial reporting.
How-To: Select the cells, open the “Format Cells” dialog (Ctrl+1), and adjust the Number tab settings for decimals, symbols, and separators.
Cell Borders and Fill: Define, Separate, Highlight
Borders and fill don’t just decorate,they separate, organize, and draw the eye.
Adding and Customizing Borders
- Borders can be solid, dotted, or dashed, with customizable colour and thickness.
Examples:
1. Use thick, black borders for table outlines, and thin, light-grey borders for internal cells.
2. Apply dotted borders to indicate forecasted or provisional data.
Changing Border Colour and Style
- Open the “Format Cells” dialog (Ctrl+1), navigate to the Border tab, and select different line styles, colours, and which sides to apply.
Examples:
1. Use red borders to flag overdue tasks.
2. Apply green, dashed borders to highlight cells for review.
Fill Colour
- The background colour of a cell. Use fill to highlight, differentiate, or group related data.
Examples:
1. Colour alternating rows with light grey for easier reading (“zebra striping”).
2. Fill key metrics with yellow to spotlight them in a dashboard.
Best Practice: Stick to a limited colour palette. Too much colour creates confusion and looks unprofessional.
Row Height and Column Width: Fit and Flow
Adjusting row height and column width means your data fits perfectly,no cut-off text, no wasted space.
Adjusting Row Height
- Right-click the row header, select “Row Height,” and enter the desired value or drag the boundary.
Examples:
1. Increase row height to fit wrapped text or images.
2. Decrease row height for compact summary tables.
Adjusting Column Width
- Similar method,drag the column boundary or use “Column Width” in the right-click menu.
Examples:
1. Widen columns for long product names.
2. Narrow columns for ID numbers or short codes.
Tip: Double-click the boundary between headers (row or column) for auto-fit.
Hide and Unhide Rows and Columns: Control the View
Not all data needs to be visible at all times. Hide and unhide lets you focus your view,without deleting anything.
Hiding Rows and Columns
- Select the row or column, right-click, and choose “Hide.”
Examples:
1. Hide intermediate calculation columns before sharing a report.
2. Hide old data rows to declutter a working sheet.
Unhiding Rows and Columns
- Select the adjacent rows/columns, right-click, and choose “Unhide.”
Examples:
1. Unhide all columns before printing a full report.
2. Reveal hidden columns when updating quarterly figures.
Use Case: Hiding is perfect for work-in-progress sheets, or when you want to present only final results.
Strike Through: Track Changes and Reviews
Strike through draws a line through text, showing it’s “cancelled” but not removed. It’s a powerful tool for reviews and collaborative edits.
Applying Strike Through
- Select the cell or text, open “Format Cells” (Ctrl+1), go to the Font tab, and check “Strike Through.”
Examples:
1. Use strike through to show old prices in a pricing update sheet.
2. Mark completed or removed tasks in a to-do list without deleting them.
Analogy: Think of strike through as Excel’s equivalent of “track changes” in Word.
Gridlines: Visual Boundaries
Gridlines are the faint lines that separate cells. Sometimes you want them, sometimes you don’t.
Toggling Gridlines
- Go to the View tab and check/uncheck the “Gridlines” option.
Examples:
1. Turn off gridlines for a cleaner look before printing reports.
2. Keep gridlines on during editing for easier navigation.
Keyboard Shortcuts: Work Smarter, Not Harder
Every second counts. Shortcuts turn you into a power user, slashing time spent on repetitive tasks.
Essential Shortcuts
- Alt: Activates the Ribbon shortcuts,each tab and command gets a letter.
- Ctrl+B: Bold
- Ctrl+I: Italic
- Ctrl+U: Underline
- Ctrl+1: Open the “Format Cells” dialog box
- Ctrl+Shift+Right Arrow: Select to the end of the row
- Ctrl+Shift+Down Arrow: Select to the end of the column
Examples:
1. Use Ctrl+B to instantly bold totals.
2. Use Ctrl+1 to open advanced formatting in seconds.
Best Practice: Learn one new shortcut per week. Small habits compound.
Selecting Data: Mastering Navigation
Precision in selection leads to precision in formatting and analysis.
Selecting Rows and Columns
- Click the row number or column letter to select the entire row/column.
- Use Ctrl+Shift+Arrow to select to the last used cell.
Examples:
1. Select column B, then Ctrl+Shift+Down Arrow to highlight all data in that column.
2. Select a row, then apply fill colour to highlight the whole record.
Selecting an Entire Table or Dataset
- Ctrl+A selects the contiguous data region around your active cell.
Examples:
1. Click inside your data table and press Ctrl+A to select the whole thing for formatting.
2. Use Ctrl+A before sorting or filtering to ensure all your data is included.
The Format Cells Dialog Box: Total Control
For fine-tuning beyond the Ribbon, the “Format Cells” dialog (Ctrl+1) is your command center.
Tabs in the Format Cells Dialog:
- Number: Control decimals, currency, dates, etc.
- Alignment: Set horizontal/vertical alignment, wrap text, orientation.
- Font: Change font face, style, size, colour, strike through, subscript, superscript.
- Border: Add and customize all borders.
- Fill: Pick background colours and patterns.
- Protection: Lock or hide cells (see advanced topics).
Examples:
1. Use the Border tab to create a custom border with a thick, blue top line and thin, grey sides.
2. Use the Font tab to apply strike through and red font to cells needing removal.
Tip: The Format Cells dialog is the only place to combine many formatting options at once.
Reporting Standards: Clean, Neat, and Professional
Managers and senior managers care about cleanliness and clarity. Your formatting is your first impression.
Importance of Clean Reporting
- Consistent fonts, sizes, and alignment signal professionalism.
- Clear separation between sections (using borders and fill) guides the reader.
Examples:
1. Submit a report with standardized headers, readable fonts, and aligned figures,managers notice.
2. Use cell styles for instant consistency across large reports.
Best Practice: Follow company standards or templates. If none exist, create your own and share with your team.
Practical Demonstrations: Learning by Doing
Theory is nothing without practice. Follow step-by-step in your own Excel workbook.
Live Demonstration Approach
- Open Excel and replicate each formatting action as you learn.
- Practice on a sample dataset,sales, expenses, inventory, or any data you have.
Examples:
1. Format a sales report to highlight top products in green and underperformers in red.
2. Create a budget sheet with currency formatting, bold headers, and wrapped text for descriptions.
Tip: Repetition is key. Format the same data in several ways to discover your preferences and build muscle memory.
Excel, AI, and the Future of Work
Formatting is the foundation; automation is the future. Understanding basic and advanced Excel is your launchpad for AI-driven analytics, reporting, and beyond.
Integration with AI Tools
- Today’s advanced Excel workflows increasingly incorporate AI,automated insights, predictive modeling, smart categorization.
- Clean, well-formatted data is the starting point for any successful AI implementation.
Examples:
1. Feeding formatted data into AI models for forecasting sales.
2. Using AI-based Excel add-ins to find trends, anomalies, or automate repetitive formatting.
Best Practice: Don’t chase AI before you master the basics. AI amplifies what you already know.
Career Guidance: Excel Skills in the Data Field
Your technical skills are only half the story. Understanding career paths and making ethical choices sets you apart.
Fake Experience: The Risk Isn’t Worth It
- Never use fake experience on your resume. Background checks are thorough, and being caught can end your career before it begins.
- If you have gaps, be honest,explain them with confidence and show what you’ve learned in the interim.
Examples:
1. Instead of faking a data analyst role, use a personal project or internship to demonstrate your skills.
2. Address gaps by highlighting upskilling, volunteer work, or freelance projects.
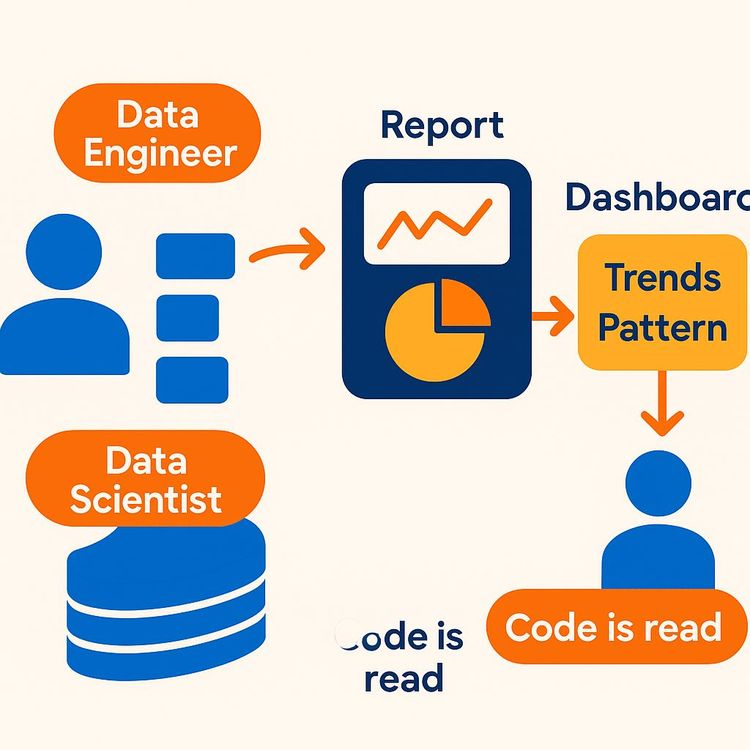
Data Analyst vs. Data Engineer vs. Data Scientist
- Data Analyst: Creates reports and dashboards from existing data.
Example: Building monthly sales dashboards in Excel and Power BI.
- Data Engineer: Collects data from various sources, cleans it, and creates data pipelines.
Example: Writing scripts to import and clean sales data before it’s analyzed.
- Data Scientist: Analyzes data to find trends and predict future outcomes; requires less complicated coding than engineering.
Example: Using machine learning models in Python to forecast customer churn.
Recommendation: If you’re looking for growth and impact, focus on data science. Companies are seeking analysts who can move beyond dashboards to predictive insights.
Prompt Engineering: Not a Standalone Skill
- Don’t rely solely on writing AI prompts. True value comes from understanding the algorithms, architecture, and being able to build solutions.
Examples:
1. Rather than just writing prompts for ChatGPT, learn the fundamentals of natural language processing.
2. Use prompt engineering as an accelerant, not a replacement, for core data and AI skills.
Learning Platforms and Practical Tips
Leverage learning management systems (LMS), shared drives, and collaborative tools to accelerate your growth.
- Use your course’s LMS to track progress and access assignments.
- Submit Excel and Python code via Google Drive or Google Colab for feedback.
- Practice with shared datasets, and review others’ work for new ideas.
Examples:
1. Upload your formatted Excel report to a shared drive for peer review.
2. Use Google Colab for hands-on Python machine learning, then integrate results with your Excel reports.
Best Practice: Treat every assignment like a real-world project. Build a portfolio you can show to managers or interviewers.
Glossary of Key Terms: Your Excel Vocabulary
Before you finish, make sure you understand these terms,they’re the language of Excel mastery.
- Ribbon: The strip of tabs and buttons at the top of the Excel window that contains all the commands and features.
- Cell: The basic unit of a worksheet, located at the intersection of a row and a column.
- Cell Identification: The unique address of a cell determined by its column letter and row number (e.g., A1, D5).
- Font Face: The design or style of the typeface used for text (e.g., Calibri, Times New Roman).
- Font Size: The size of the text, typically measured in points.
- Bold / Italic / Underline: Formatting options to emphasize or distinguish text.
- Number Format: The way numerical values are displayed in a cell (e.g., currency, percentage, decimal).
- Decimal Places: The number of digits shown after the decimal point in a number.
- Currency Format: A number format that displays monetary values with a currency symbol and typically two decimal places.
- Alignment: The positioning of text within a cell (e.g., left, centre, right, top, middle, bottom).
- Text Orientation: The direction in which text is displayed within a cell (e.g., horizontal, vertical, angled).
- Wrap Text: A formatting option that allows long text strings to break into multiple lines within a cell to fit within the column width.
- Merge Cells: A formatting option that combines two or more selected cells into a single larger cell.
- Cell Styles: Predefined combinations of formatting attributes (font, colour, borders, etc.) that can be applied to cells.
- Row Height / Column Width: The vertical and horizontal dimensions of rows and columns.
- Borders: Lines that surround a cell or range of cells.
- Border Color / Thickness / Style: The colour, weight, and appearance (e.g., thin, thick, dotted, dashed) of the border lines.
- Fill Color: The background colour of a cell.
- Strike Through: A text effect that draws a line through the middle of the text.
- Subscript / Superscript: Text that is placed below or above the normal text line.
- Gridlines: The faint grey lines that separate cells in a worksheet by default.
- Format Cells Dialog Box: A comprehensive dialog box in Excel that provides detailed options for formatting numbers, alignment, font, border, fill, and protection.
Conclusion: Applying Advanced Excel with AI
You’ve walked through every corner of Excel’s formatting landscape,from the first cell you click to the final report you deliver. Along the way, you’ve learned not just the “how” but the “why” behind every feature.
What sets you apart isn’t the ability to format cells or apply styles,it’s the discipline to create clean, clear, and professional work, every time. It’s the wisdom to use shortcuts, templates, and automation to save time and reduce errors. It’s the insight to transition from formatting to analysis, from analysis to prediction, and from prediction to action.
Your next steps are to practice relentlessly, seek feedback, and always look for ways to incorporate automation and AI into your workflow. Remember: Excel mastery is foundational, but your growth comes from curiosity, consistency, and the courage to push beyond the basics.
Apply these skills, build your portfolio, and prepare for a future where your expertise in Excel and AI makes you indispensable to any team or organization.
Frequently Asked Questions
The FAQ below addresses a wide range of common and advanced questions about using Excel for business, with a special focus on integrating AI features. Whether you're clarifying basic formatting, exploring time-saving shortcuts, or looking to apply AI-driven automation, you'll find answers to help you use Excel more efficiently and professionally.
What Excel formatting topics are covered in this course?
The course covers a range of basic formatting topics in Excel.
Key areas include formatting individual cells and their content, cell alignment (right, left, merge, wrap text), applying cell styles, inserting background images, changing themes, and hiding or unhiding rows and columns. More specifically, the course delves into changing font face, colour, style (bold, italic, underline), and size, as well as working with number formats, cell background colour, and adjusting row height and column width.
How do you change the font style, size, and colour in Excel?
You can change the font style, size, and colour of a cell's content in Excel using the "Home" tab on the ribbon or via keyboard shortcuts.
To change the font face, you can use the "Font" group on the Home tab and select from the available font styles. To make text bold, italic, or underlined, you can use the 'B', 'I', and 'U' buttons in the Font group or the keyboard shortcuts Ctrl+B, Ctrl+I, and Ctrl+U respectively. Font size can be adjusted using the size dropdown next to the font style. To change the font colour, use the 'Font Colour' option (represented by an 'A' with a colour underline) in the Font group and select your desired colour.
How can you format numbers in Excel, such as adding decimal points and currency symbols?
Number formatting in Excel can be done through the "Number" group on the Home tab or by pressing Ctrl+1 to open the "Format Cells" dialogue box.
In the Number group, you can increase or decrease decimal places using the dedicated arrow buttons. To apply currency formatting, you can use the currency dropdown menu which includes various currency symbols. For more advanced currency options and to select specific regional currency symbols like Indian Rupees, you can go to the "Number" tab within the "Format Cells" dialogue box, select "Currency" or "Accounting," specify the number of decimal places, and choose the desired symbol from the dropdown list.
What is the purpose of "Wrap Text" and "Merge Cells" for handling long text strings?
"Wrap Text" and "Merge Cells" are alignment features used to manage long text strings within cells.
"Wrap Text" automatically adjusts the row height and wraps the text within the cell's column width, ensuring all content is visible within that single cell without overflowing into adjacent cells. "Merge Cells," on the other hand, combines multiple selected cells into one larger cell. While merging can be useful for creating titles or headings that span across several columns, the speaker in the source seems to prefer "Wrap Text" for accommodating long strings within a single cell to maintain the structure and readability of the data for users.
How do you add, remove, and format cell borders in Excel?
Cell borders can be added, removed, and formatted using the "Borders" option within the "Font" group on the Home tab or through the "Format Cells" dialogue box (Ctrl+1).
The Borders option provides preset options like "All Borders," "Outside Borders," "No Border," etc. For more control, the "Format Cells" dialogue box allows you to choose different line styles (solid, dotted, dashed), line colours, and specify which borders to apply (top, bottom, left, right, inside). You can also use the "Draw Border" and "Erase Border" tools for more manual control over border application and removal.
How can you change the background fill colour of a cell in Excel?
To change the background fill colour of a cell, you can use the "Fill Colour" option (represented by a paint bucket icon) in the "Font" group on the Home tab.
Click on the paint bucket icon and select a colour from the palette. You can choose from theme colours, standard colours, or access "More Colours" for custom options. Selecting "No Fill" will remove any existing background colour, effectively making the cell background white.
How do you adjust row height and column width in Excel?
You can adjust row height and column width in Excel in several ways.
One method is to click and drag the border between row numbers or column letters to manually resize. Another way is to double-click the border to auto-fit the row height or column width based on the content. For precise adjustments, you can right-click on the row number or column letter and select "Row Height" or "Column Width" respectively, then enter a specific value. Alternatively, within the "Format Cells" dialogue box (Ctrl+1), under the "Alignment" or "Fill" tabs, you can find options to set precise row height and column width values. The source specifically highlights using the "Format" option on the Home tab of the ribbon to access "Row Height" and "Column Width."
Are there opportunities for further learning after this basic Excel formatting session?
Yes, the session concludes by outlining opportunities for further learning.
This basic Excel formatting session is presented as potentially part of a larger curriculum. The speaker mentions a more comprehensive "Advanced Excel with AI Automation" course available for a fee. Additionally, this Excel course is highlighted as being included within a broader "Data Science with Generative AI" full course, which covers a wide range of topics including Python, SQL, machine learning, deep learning, AI, and offers internship opportunities for freshers. Recordings from previous batches are also available for those interested in self-paced learning.
How do you identify the location of a cell in Excel?
Each cell in Excel is uniquely identified by its column letter and row number.
For example, cell "D5" is located at the intersection of column D and row 5. This cell reference appears in the Name Box above the worksheet. Understanding cell identification is crucial for functions, formulas, and data navigation.
What is the Excel ribbon and how do you use it to access formatting options?
The ribbon is the strip of tabs and buttons at the top of the Excel window that contains the majority of Excel’s commands and features.
You can access different formatting options by clicking on tabs like "Home," "Insert," "Page Layout," and more. Each tab contains groups (e.g., Font, Alignment, Number) that organize related commands. For formatting, the "Home" tab is your primary resource.
What are the most useful keyboard shortcuts for basic formatting in Excel?
Keyboard shortcuts help you work faster and more efficiently in Excel.
Common shortcuts include:
- Ctrl+B: Bold
- Ctrl+I: Italic
- Ctrl+U: Underline
- Ctrl+1: Open the Format Cells dialog
- Alt: Reveal ribbon shortcut letters
- Alt+H: Go to Home tab
- Ctrl+Shift+Arrow Keys: Select ranges quickly
Using these shortcuts can save significant time, especially when formatting large datasets.
How do you align cell contents (left, center, right) and adjust text orientation?
Alignment options are found in the Alignment group on the Home tab.
You can align text left, center, or right, and also adjust vertical alignment (top, middle, bottom). For text orientation (e.g., vertical, angled), click the "Orientation" button in the Alignment group and select the desired angle or direction. This is especially helpful for headings or fitting data in narrow columns.
What is the Strike Through effect and when is it useful?
Strike Through draws a line through the center of text in a cell.
It's useful for indicating completed tasks, marking items as deleted, or showing changes in a document review. To apply it, select the cell(s), open the Format Cells dialog (Ctrl+1), and check the "Strikethrough" box under Font.
What is the difference between changing the font colour and the fill colour of a cell?
Font colour changes the colour of the text itself, while fill colour changes the cell’s background.
For example, setting the font colour to red makes the text red, but setting the fill colour to yellow keeps the text the same while filling the cell’s background with yellow. Use both together for emphasis or to highlight key data.
What are cell styles and how do you use them?
Cell styles are predefined sets of formatting options that can be applied to cells for consistency and efficiency.
Find them in the "Styles" group on the Home tab. They include combinations of font, fill, border, and number formatting. For example, you can quickly apply a "Good," "Bad," or "Neutral" style to highlight data quality.
How do you insert a background image or change the theme in Excel?
To insert a background image, go to the "Page Layout" tab and click "Background."
Select an image from your computer or online. This image appears behind your data (for visual effect only; it doesn't print by default). To change the theme, select "Themes" on the "Page Layout" tab and choose from various colour schemes and fonts to customize the workbook's appearance.
How do you hide or unhide rows and columns in Excel?
To hide a row or column, right-click its header and select "Hide."
To unhide, select the rows or columns surrounding the hidden ones, right-click, and select "Unhide." This feature helps you temporarily conceal data without deleting it, keeping worksheets clean and focused.
What shortcuts allow you to select rows, columns, or entire tables quickly?
Use Ctrl+Space to select an entire column, Shift+Space to select an entire row.
Ctrl+Shift+Right Arrow extends the selection to the last used column, and Ctrl+Shift+Down Arrow extends to the last used row. Ctrl+A selects the entire worksheet or, if inside a table, just the contiguous block of data. These shortcuts are essential for fast formatting and data manipulation.
How do you show or hide gridlines in Excel?
Gridlines are the faint lines that separate cells by default.
To hide or show them, go to the "View" tab and check or uncheck the "Gridlines" box. Gridlines are helpful for visually organizing data but can be turned off for a cleaner look when preparing sheets for presentation or printing.
What is the "Format Cells" dialog box and what advanced formatting does it offer?
The "Format Cells" dialog box (opened with Ctrl+1) provides detailed control over cell formatting.
It allows you to adjust number formats, alignment, font, border, fill, and protection settings. For example, you can customize border styles and colours, set specific number formats (date, time, custom), or apply text effects like superscript or subscript,features not all accessible directly from the ribbon.
How do you change the text orientation (angle) within a cell?
To rotate or angle text, select the cell(s), go to the "Home" tab, and click the "Orientation" button in the Alignment group.
Choose from preset angles or enter a custom degree of rotation. This is especially useful for column headers in wide tables to save space or improve readability.
What are some common formatting mistakes to avoid in Excel?
Common mistakes include overusing merge cells, excessive colour, inconsistent font sizes, and not using cell styles.
Over-merging makes sorting and filtering difficult, while too much colour or inconsistent styles can make data hard to read. Use formatting intentionally to improve clarity, not to decorate.
What are some tips for quickly formatting large datasets?
Use Format Painter to copy formatting, apply cell styles for consistency, and leverage keyboard shortcuts for speed.
Select a well-formatted cell, click Format Painter (Home tab), and paint the formatting onto other cells. Use shortcuts like Ctrl+1 for detailed formatting and Ctrl+Shift+Arrow Keys to select large ranges.
How do you undo formatting changes in Excel?
Press Ctrl+Z immediately to undo the last action.
For broader resets, use "Clear Formats" in the Editing group on the Home tab to remove all formatting from selected cells, returning them to default without affecting the data.
How does AI enhance Excel's capabilities?
AI brings automation, advanced analytics, and natural language processing to Excel.
Features like "Analyze Data" (formerly Ideas) allow you to ask questions about your data in plain language and receive insights or charts instantly. AI-driven add-ins can automate repetitive tasks, detect anomalies, or forecast trends. For example, you can quickly generate pivot tables or identify outliers in sales data using built-in AI tools.
What are the requirements to use AI-powered features in Excel?
Most modern AI features require a Microsoft 365 subscription and an active internet connection.
Some capabilities, like "Analyze Data," may also depend on your region and Excel version. Check your Excel updates and subscription status to access the latest features.
What are practical business applications of AI in Excel?
AI in Excel can automate reporting, generate insights, and support decision-making.
Examples include using "Analyze Data" to summarize key trends, leveraging AI add-ins to clean large datasets, or applying machine learning models to forecast sales. These tools can save hours on tasks like monthly reporting or preparing presentations for stakeholders.
What challenges might I face when using AI features in Excel?
Common challenges include data quality issues, compatibility limitations, and learning curve with new features.
AI tools work best with well-structured, clean data. Inconsistent formats or missing values can lead to inaccurate insights. Additionally, some features may be unavailable in older versions or without a Microsoft 365 subscription. Training and practice help overcome the initial adjustment period.
How can automation help with data cleaning in Excel?
Automation, including AI-powered tools and macros, can detect duplicates, correct errors, and standardize formats.
For instance, AI add-ins can automatically identify inconsistent entries (like misspelled product names) or flag outliers. Macros can be recorded to automate repetitive cleaning steps, such as removing empty rows or converting text to proper case.
Are AI features in Excel secure, and how is my data protected?
Microsoft prioritizes data security and privacy, especially for AI features that process data in the cloud.
Your data is encrypted during transmission and storage. Always review your organization's policies and settings, especially when handling sensitive or confidential information. Use trusted add-ins and be mindful of sharing data externally.
Can AI help with creating or understanding complex formulas in Excel?
Some AI-powered tools can suggest formulas or help explain existing ones.
Features like "Analyze Data" might recommend calculations or even auto-generate formulas for common tasks. Third-party add-ins can provide plain-language explanations of how a formula works, making it easier to troubleshoot or modify complex logic.
What are best practices for formatting Excel reports for business use?
Prioritize clarity, consistency, and professionalism in your formatting.
Use cell styles for headings, keep fonts and colours consistent, align numbers for easy comparison, and apply borders sparingly for separation. Avoid unnecessary decoration,focus on making the data easy to interpret for decision-makers. For example, use bold for summary rows and subtle shading for alternating rows to improve readability.
When should you use "Merge Cells" versus "Wrap Text"?
Use "Merge Cells" for creating titles or headers spanning multiple columns.
For long text within a single column, use "Wrap Text" to keep the structure intact and avoid issues with sorting or filtering. Overusing "Merge Cells" can create problems with data analysis, so use it selectively for layout purposes.
How do you apply custom number formatting in Excel?
Open the Format Cells dialog (Ctrl+1), go to the Number tab, and select "Custom."
You can create custom formats using symbols (e.g., #, 0, %, $) and codes. For example, to display numbers as "000-000," enter "000-000" as a custom format. This is useful for IDs, phone numbers, or specialized reporting.
Are AI features in Excel compatible with all operating systems?
Most AI features are available in the Windows and web versions of Excel with a Microsoft 365 subscription.
Some features may have limited availability or different interfaces on Mac or mobile versions. Always check your system's compatibility if you rely on specific AI tools for your workflow.
Can AI help automate tasks using macros in Excel?
AI and macros are separate, but some modern AI add-ins can suggest or generate VBA code for common tasks.
For example, you might describe a repetitive action in plain language, and an add-in could offer sample macro code to achieve it. This helps bridge the gap for users who aren't familiar with programming but want to automate tasks.
How does AI impact collaboration in Excel?
AI-powered features like "Co-Authoring" and automated insights streamline teamwork.
Multiple users can work on a workbook simultaneously, and AI can help identify trends or flag issues in shared data. For example, AI can automatically update charts or summary tables as new data is entered by different team members.
How do you ensure your Excel sheets are accessible to everyone?
Use accessible formatting: clear headings, high-contrast colours, and meaningful alt text for images.
Excel’s "Accessibility Checker" (Review tab) can scan your workbook for issues and suggest improvements, such as adding descriptive text for charts or avoiding colour combinations that are hard to read for colourblind users.
What are the limitations of AI features in Excel?
AI can't always interpret poorly structured or incomplete data, and not all features are available in every version.
It's important to review AI-generated insights for accuracy, especially in complex or nuanced business scenarios. Use AI as a support tool, not a replacement for your expertise.
Where can I find more resources to learn about AI in Excel?
Microsoft provides tutorials, documentation, and sample workbooks on their official support site.
Online platforms, forums, and business-focused courses also offer in-depth guides and practical examples. Consider joining Excel user communities to stay current with new features and best practices.
What should I do if an AI feature is not working as expected in Excel?
First, check for updates to Excel and confirm your Microsoft 365 subscription status.
Restart Excel, and make sure your data is well-structured. If the issue persists, consult the official help documentation or reach out to your IT support. Sometimes, regional restrictions or company policies may affect feature availability.
What future trends should I watch for in Excel and AI?
Expect continued improvements in natural language querying, predictive analytics, and seamless integration with other business tools.
Features may evolve to include more automated insights, deeper connections with cloud services, and smarter error detection. Staying informed about these trends will help you make the most of your skills and tools.
Certification
About the Certification
Become certified in Excel Formatting and AI Automation, demonstrating expertise in advanced formatting, automated reporting, and AI integration to deliver polished, efficient spreadsheets and actionable insights that enhance business productivity.
Official Certification
Upon successful completion of the "Certification in Applying Advanced Excel Formatting and AI Automation for Productivity", you will receive a verifiable digital certificate. This certificate demonstrates your expertise in the subject matter covered in this course.
Benefits of Certification
- Enhance your professional credibility and stand out in the job market.
- Validate your skills and knowledge in cutting-edge AI technologies.
- Unlock new career opportunities in the rapidly growing AI field.
- Share your achievement on your resume, LinkedIn, and other professional platforms.
How to complete your certification successfully?
To earn your certification, you’ll need to complete all video lessons, study the guide carefully, and review the FAQ. After that, you’ll be prepared to pass the certification requirements.
Other AI Video Courses

Video Course: What is Generative AI and how does it work?

Video Course: How to Use ChatGPT from Beginner to Professional

Video Course: How to Use Google Gemini for Google Workspace to Boost Productivity

Video Course: How to Use Claude 3.7 AI - Tips for Beginners!

Video Course: ChatGPT for Data Analytics: Full Course - from Beginners to Professional

Video Course: Generating Images and photos With ChatGPT?

Video Course: Generating Images & Photo's with MidJourney

Video Course: Generating Design's with Microsoft Designer and AI

Video Course: Generating Design's with Canva.com and AI
Join 20,000+ Professionals, Using AI to transform their Careers
Join professionals who didn’t just adapt, they thrived. You can too, with AI training designed for your job.


